Host a super-fast WordPress site on Amazon / EC2 — same price or less as conventional shared-server hosting! Test it out for free in 10-15 minutes, and maybe pay nothing for a year!
1. Background and Purpose of this article
Note: if you just want to create a new site in AWS in 15 minutes or less, for testing or whatever, navigate to the video in Section 5 below.
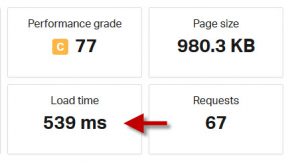
Pingdom Tools report of wpacademy.com after migration to a t3a-micro Amazon EC2 instance.
Amazon Web Services is, of course, the world’s largest provider of web hosting and data management solutions. What few people know is that AWS is also a practical and affordable solution for high-performance WordPress web hosting, providing speed comparable to a high-end host such WP Engine but at a fraction of the price. I reduced my page load time from about 3 seconds to 540ms (this was with WP Super Cache plugin, but non-cached site was still 1.0 seconds) And I was previously on GreenGeeks, which is an excellent host!
This article provides a detailed check-list and action / migration plan for moving your WordPress site from shared hosting to an Amazon AWS / EC2 instance.
Preamble: Cautions & Full Disclosure
- Moving your WordPress site to AWS / EC2 has compelling advantages, particularly in terms of performance per cost unit; but it also has risks in terms of security and support. These are covered below in the section entitled “Risks”. Make sure you understand this before moving forward
- I have commercial intent in writing this as I provide a super-affordable service that will do all the heavy-lifting for you. I have also taken every opportunity imaginable to give affiliate links in this article 🙂 . However, my recommendations are guided by what I think will serve YOU rather than affiliate income.
(And if you are not up for anything as intensive as moving to AWS, check out my list of recommended hosts in the sidebar. These are some of the best WordPress hosts in the world, as per my research) - Migrating a site that is currently on conventional shared-hosting is technically demanding and will normally require some knowledge of Linux command-line; however starting a new WordPress site (and particularly a test site) on Amazon EC2 is easy. It will take you 10-15 minutes and might be fun for you and maybe free 🙂 . Just check out the video below and give it a shot!
2. What is AWS / EC2?
Note: if you just want to get started on a test site and are not interested in the full story right now, skip directly to the video below in Section 5a.
EC2 stands for “Elastic Compute Cloud” and is a highly scalable cloud-based computing infrastructure. Essentially what you are buying with EC2 is a self-managed Virtual Private Server (VPS) — but for very minimal investment. However, it is better than a traditional VPS because you can start / stop the contract at any time just by shutting down your instance, because you can upgrade or downgrade with a few clicks, and because you are guaranteed a super-robust and highly-scalable server environment. The main down-side — what you are NOT getting compared to managed VPS — is that you are not getting server O/S or application support. More on this below under “risks”.
Note: Another popular provider in the cloud-hosting VPS space is Digital Ocean. Their prices are crazy ($5/mth to begin), but it seems that AWS has a stronger infrastructure at a slightly higher price (minimum $8/mth). This article is based on the Amazon EC2 service.
3. Typical costs
Be aware that AWS charges for ALMOST EVERYTHING (exception: Free Usage Tier below),which includes an hourly or monthly charge for your instance’s CPU and memory, Storage, Bandwidth, Static IP’s, and more. The bulk of the costs however, occur in your active instance’s hourly rate. Billing for active instances starts at roughly $0.01 per hour ($0.24 per day, or $7.20/mth), so that is the minimum you will pay for an application like a website that needs to be running all the time (Pricing details here). On the upside, your EC2 instance can host all your sites (see below).
Free Usage Tier: If you are a new Amazon EC2 customer, you can get a t2-micro instance (1 CPU, 1GB RAM) free for 1-year. Note that t2-micro doesn’t have much bandwidth so its only good for a low-traffic site such as a personal blog. However, performance will be great.
4. Risks: Support Issues, Backup etc
The down-side of AWS / EC2 is that you are not getting either WordPress support or server (O/S) support. So you must be fairly WordPress-literate to take this on, and also have some familiarity with Linux and SSH (or alternatively let us set it up for you). As an alternative to using AWS to create your high-performance WordPress site, you can get an enterprise-level hosting package such as WP Engine. But regardless, a traditional shared host, even the best of them, will never be able to match the performance of even the smallest EC2 instance. At least in a predictable manner.
To mitigate this problem of support, it is essential to have a strong off-site backup strategy in place. I recommend VaultPress which only costs $3.50/mth, has awesome support, and will also do your migration (more info on this below). You can also (or additionally) use the free (and awesome) Updraft Plus, however the free version of Updraft won’t do the migration for you.
The lack of server O/S support basically means that you will NOT be upgrading or patching your O/S (you CAN configure AWS to do this, but its complicated). This may introduce security vulnerabilities; especially as your server software ages. However, its not a deal-killer (IMHO) if you keep a fairly recent server image on EC2 (you can reboot from a server image in a few minutes), along with with a cloud-based backup via VaultPress or some other method. I am also recommending you run your site through CloudFlare as they will block most hackers. In a worst-case scenario, if things get really bad, you can signup to an AWS Support program at a cost of $30/mth and get them to upgrade your O/S and secure it. Be aware in any case, that after 4-5 years you will probably need to hire someone to upgrade your O/S (i.e. the default PHP version), or maybe just migrate your site to a fresh instance.
And finally, you will need to setup an email provider for your site, as EC2 doesn’t come with outgoing email (unlike shared hosting providers). I recommend either Zoho Mail ($1/mth!) in conjunction with the WordPress WP Mail SMTP plugin, Google G-suite over SMTP, Amazon SES in conjunction with the WP Offload SES Lite plugin, or even (if you want to do it on-the-cheap) Gmail over SMTP.
But with those caveats, let’s get right into it. AWS is fun!
5a. Initial Steps: Create your new site
The video below covers all the steps in this section.
- Signup to Amazon EC2 and enter a payment method. It uses your regular Amazon.com email and password.
- In the global AWS “Find Services” box type EC2, which will take you to your EC2 dashboard.
- Click “Instances” on the left
- Click “Launch Instance”
- Choose your build (also known as an “Amazon Machine Image” or AMI). This tutorial is based on the AMI WordPress with NGINX and SSL Certified by Bitnami and Automattic. I chose this because NGINX is very fast and because it comes with a built-in 5-minute free Let’s Encrypt SSL creation script (see below). The build documentation is here. It’s a robust build, unlike a few others I have tried [I am being kind here].
In your launch sequence, you choose your AMI by selecting the “AWS Marketplace” AMI list on the left and then search for “Bitnami wordpress nginx”. Select this and “Next” - Choose your instance type. A free-tier eligible t2-micro is good for a low-traffic site or blog. The smallest “commercial” instance type would be a t3a-micro (~ $0.01/hr) or a t3a-small (~$0.02/hr) instance. The t3a’s give you some real bandwidth (up to 5Gb/s outgoing) compared to the t2’s.
- Make sure you create a new SSH key-pair and save the .pem file to your computer. You will need it in the next step.
- Login to the WordPress site by following these instruction (skip to where it says “Get WordPress credentials”). Once logged-in to your dashboard, either update the password for the “user” default username, or else create a new user with Administrator privileges (through the WordPress User > Create New User menu)
At this point (Congrats!) you have a regular WordPress site, except you will notice it is much faster than the WordPress that you have become accustomed to 🙂 . You can add plugins and themes, etc. You can also immediately migrate-in your current site using All-in-One WP Migration, provided your total site backup size is less than 40M. Eureka!
Note: for migrating a site larger than 40M, see UpdraftPlus vs. All In One WP Migration vs. BackupBuddy: How to copy or migrate your WordPress site to another host or domain. You may also purchase my All-in-one WP Migration crack which removes the 40M upload limitation.
5b. Assign a Static IP and/or a new domain name using Amazon Route 53
This is how you assign a domain name to your site. Get a free .tk domain from Freenom if you like, to test this step. Note: if you are migrating in, don’t do this yet as you need to first backup your current site.
- Use these instructions to assign a static IP and domain name to your EC2 instance.
Note (1): until you do this, your instance’s IP address will change every time your reboot it
Note (2): there is an AWS charge for assigning static IP’s if your instance is not active, so make sure you delete your Route 53 “Hosted zone” if you terminate your instance - You don’t need to buy a domain through AWS. You can use any domain you own, as in a domain from Freenom
- Change your domain’s name servers. Within a few minutes (typically) your site will be visible at http://www.yourdomain.com.
If you got to the end of this: well-done, grasshopper! You will soon be a Ninja. Especially after you complete the next section.
5c. Access your site through SSH, clean-up and re-configure
In the following sections we get to the more meaty work here. For some this will be hair-raising, and we would be happy to help you. The point however, is that for a new site you can stop right here (in the section above) with your super-fast and cheap (or maybe free for a year) WordPress website. Eureka!
Anyway. Carrying on.
- Configure SSH access using these instructions. On Windows you will need to first install Putty (which includes PuttyGen, which you will need to convert your .pem file to a .ppk file that Putty uses)
Important: Connect as user “bitnami”, i.e. your SSH “Host name” will look something like [email protected]
Normally you run Putty from a command prompt (in Windows Start Menu > cmd.exe) and then type “Putty” or “PuttyGen”. I like to keep all my .ppk files in Directory c:\users\marc to simplify access to my key files from Putty. - (Optional) Transfer files using pscp. From this same Windows Command Prompt, you can enter a command such as:
pscp -i wpacademy.ppk wp-content.zip [email protected]:
(this uploads the file “wp-content.zip” to the HOME directory of your “bitnami” user, using the security credentials stored in “wpacademy.ppk”)
Note: You “paste” in Putty Windows through right-mouse-click. Don’t stress 🙂 . Also in Windows Command Prompt you can “edit” and resubmit your last command by pressing cursor-up. Same in Putty / Linux 🙂 - Remove the Bitnami bottom-right banner on your site in your SSH client by following these instructions.
- The Bitnami AMI is configured for a 128M PHP Memory Limit. In my experience this is too low for WordPress, it should be a minimum 256M and maybe 512M for WooCommerce or intensive use (I have had problems with WooCommerce with even a 256M PHP memory). You do this by editing the file /opt/bitnami/php/etc/php.ini through your SSH client (using nano or vi Linux commands, or else SFTP — see below); and then changing the value of php_memory_limit to 512M. Also, if you want to use All-in-One WP Migration to restore your site (rather than the recommended VaultPress) you will probably need to increase (in your php.ini) your upload_max_filesize and post_max_size to 256M or higher.
(Note: I have not found All-In-One WP Migration reliable on Bitnami builds for sites over 100M). After making changes to php.ini, reboot your instance (right-click on your instance name in your EC2 dashboard and select “Reboot”) - Your web directory is /opt/bitnami/apps/wordpress/htdocs. In Linux you can move to this directory with the command: cd /opt/bitnami/apps/wordpress/htdocs (remember right-click in Windows is the same as “paste”. Try it!). You can also permanently enter super-user (su) mode with the command: sudo su
- Optional: Configure SFTP. For editing Linux files, if you are not familiar with the Linux commands nano or vi, you can connect (on Windows) with Filezilla through SFTP, transfer the file to your computer, edit it there, and send it back. Follow these instructions to connect Filezilla to your EC2 site via SFTP.
Important note: use the “bitnami” user as per above — NOT “root” or anything else. If you MUST use root, you will need to follow these instructions on bitnami installs to enable SFTP through root - You may desire to install your Let’s Encrypt SSL right away, but you need to wait until you change name servers on your domain and your site is resolved to your new EC2 instance. More information about SSL below.
5d Migrate-in your current site using VaultPress
Note: All in One WP Migration works fine for sites under 40M (and up to 512M if you have increased your upload_max_filesize and post_max_size in php.ini as described above). So, for small sites this might be the preferred solution. To do this, you back up your old site, download the .wpress backup file to your computer, install the plugin on your new site, and then upload it to your new site with All-in-One > Restore > File upload. See also related article UpdraftPlus vs. All In One WP Migration vs. BackupBuddy: How to copy or migrate your WordPress site to another host or domain
VaultPress is truly an amazing software, and especially at this price point. You WILL need a strong off-site backup solution for your AWS site, as already mentioned, and hopefully some support for it. VaultPress takes the (very intelligent) attitude that your WordPress system files are the responsibility of your operating system (NOT of your backup software), and so, it only backs up the database and the wp-content directory. This is especially important when you are moving to a VPS such as Amazon Web Services (because the WordPress executables and configuration files are going to be setup for the particular O/S in use, i.e NGINX — a VPS is a very different animal than an Apache-based shared-hosting.
Here are the steps to backup your site with VaultPress and then restore to your AWS instance:
- Open an inexpensive account at VaultPress/Automaticc (WordPress.org). Then, from your WordPress dashboard, install the VaultPress plugin and connect your site to that WordPress.org account
Note: technically speaking, “Personal” accounts are only for personal blogs. But nobody seems to be counting here 🙂 - Once this is done, your site will get backed-up automatically to cloud-storage on Automaticc (WordPress.org). Please be patient, this can take a day or more for larger sites
- Once your VaultPress backup is complete, you are going to restore your site to an “Alternate url” (your new site i.e http://44.5.65.88) as per these instructions.
Note: you will need to setup your “Alternate SSH” credentials on VaultPress. This is a bit confusing and I am currently working with VaultPress on this. For now, use user “bitnami” and path-to-web-directlory /opt/bitnami/apps/wordpress/htdocs. You also need to add their “public key” to the file /home/bitnami/.ssh/authorized_keys file (use vi or nano) and change permission as follows: chmod 600 authorized_keys (make sure you are logged in as bitnami user here) - Verify your “SSH alternate site” credentials are working on VaultPress, and then order a restoration to Alternate site, and wait for it to happen. This can take a while.
- When your site is restored, you will see it live at http://<your-IP>. Yay! Do something nice for yourself, here (you deserve it)
5e. Resolve your site to your domain name (rather than an IP)
And this is where you do the procedure in Section 5b to assign a domain. Then change your domain’s name servers to the AWS name servers (you do this from your domain registrar of course, be they Godaddy or NameCheap or Freenon). Before you do that, make sure you add any MX, CNAME, or TXT records necessary to the Amazon Route 53 Hosted Zone.
Once your site is resolved (wait a few hours to be sure), you need to make some changes to your database. Enter the following commands in an SSH window:
(1) Get your mysql database password from your SSH terminal:
grep DB_PASSWORD /home/355094.cloudwaysapps.com/gfwqjwgqun/public_html/wp-config.php
And then copy it someplace (cntrl-C)
(2) Run the mysql command line with:
mysql -u bn_wordpress --password='yourpassword' bitnami_wordpress
(Note: bn_wordpress is your mysql user and bitnami_wordpress is your database name)
You ought to get the mysql command prompt
Easier Alternative: Get into your site’s mysql interpreter directly through WP-CLI:
wp db query
(3) And then run the following sql commands (remember right-click to paste — one per line):
UPDATE wp_wpacademyoptions SET option_value = ‘http://PermanentDomain’ WHERE option_name = ‘siteurl’ LIMIT 1;
UPDATE wp_wpacademyoptions SET option_value = ‘http://PermanentDomain’ WHERE option_name = ‘home’ LIMIT 1;
UPDATE wp_wpacademyposts SET post_content = REPLACE(post_content, ‘http://TemporaryDomain’, ‘http://PermanentDomain’);
UPDATE wp_wpacademycomments SET comment_content = REPLACE(comment_content, ‘http://TemporaryDomain’, ‘http://PermanentDomain’), comment_author_url = REPLACE(comment_author_url, ‘http://TemporaryDomain’, ‘http://PermanentDomain’);
(Replace “temporary domain” with your assigned IP e.g. ie. http://33.6.5..66, and “PermanentDomain” with http://www.yourdomain.com. I like to copy these commands into a Notepad window, edit them there, and then copy them back — remember mouse right-click is the “paste” command into Putty)
At this point, if all goes well, your site should be restored and functioning at http://www.yourdomain.com. Check all is working fine and then celebrate by taking an AIM image of your instance 🙂 . (right-click on your instance in your Amazon EC2 dashboard, and select “Create Image“). Also install Updraft Plus plugin on your site and back it up locally.
5f. (Optional) Install your Let’s Encrypt SSL
The procedure to install a Let’s Encrypt SSL on a Bitmani install is described here. It works beautifully, but note that you do NOT need to install the Lego client, it is already installed. You DO need to have your domain resolved to your new installation before this will work.
To summarize: you really only need to run the script in the article above (substitute appropriate parameters, something link this below), this will install a certificate that will be good on BOTH yourdomain.com and www.yourdomain.com:
sudo /opt/bitnami/letsencrypt/lego --tls --email="[email protected]" --domains="yourdomain.com" --domains="www.yourdomain.com" --path="/opt/bitnami/letsencrypt" run
And finally, you need to setup a cron job to renew your Let’s Encrypt certificate every 3 months (at most). This is described here. (Lego is already installed on Bitnami/NGINX, skip to Step 2).
6. Hosting multiple WordPress websites on Bitnami / Nginx
You can use a single EC2 instance to host all your sites! You could even (potentially) sell high-performance hosting plans from you $8/mth EC2 instance. You would only need to upgrade your EC2 as server load and traffic increases.
This does require a little Linux wizardry however. See this article. After doing these steps and setting up WordPress in the alternate directories, you would point your additional domains to your instance via “A” records.
7. Final Notes: Amazon EC2 Performance on WordPress, etc.
WP Academy is currently (August 2019) receiving 2-3k visits per month. It is hosted on a t3a-micro instance (about $8/mth) and is using, on average, less than 1% CPU (according to CloudWatch Management Console). In other words, you can host 10-20 moderately-trafficked sites on EC2 before needing to upgrade (you would need to upgrade a t3a-micro instance when your average CPU utilization goes above 10-20% as per their CPU Credits scheme). I am getting very consistent 1.0 second page load times on WP Academy without using caching — unlike my other sites hosted on GreenGeeks (which, as I say, is already a superior host) which loads between 2 and 3 seconds depending upon time of day. Other shared hosts may be worse.
Note as well that these results are with the Divi theme, which is a quite “heavy” theme. If you are using a more efficient theme such as StudioPress, your page load times will likely be in the 300-500 ms range.
Check your own site performance now with Pingdom Tools! And then decide if cutting your page load times to 0.5 – 1.0 seconds is worth the trouble and the risk. Remember that you will be getting performance comparable to the $35/mth WP Engine Startup Plan, and you won’t have to upgrade to their even-pricier-plans when you start to exceed 10,000 monthly visits. Plus you can host all your sites!
